Showing posts with label tile. Show all posts

Sunday, March 16, 2014

All about water prep this time

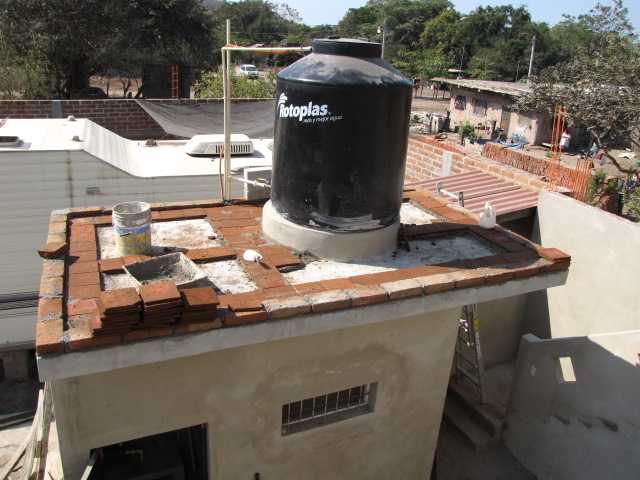
Three water related projects that are mostly done. Only the complete impermeabilizante job of the roof is left. Much of the roof was just a cement wash over tile and then coated with impermeabilizante. Sometimes the wash lifts and sometimes foot traffic wears the coating down. Unfinished tile or cement is porous so you have to paint or seal it somehow. I've done the patching in obvious places, next to paint the whole thing.

While crawling around the gas tank (background 2nd foto) I noticed the seams rusting.  Then I noticed any little scratch had rusted.   Then I noticed on both rounded ends the paint had little bubbles with no apparent damage to cause them.  A few bubbles had broken and rusted in side.  This tank is only 3 years old.   I know it sits in sun and rain uncovered but still ....  can't they coat something as possibly dangerous as a gas tank a little better.   So there it is, sanded and painted and I'm thinking about a cover.

The final foto is of the not quite aesthetically pleasing solution to keep roof water out of my yard and into the street.   I really preferred the ceramic scuppers on that side of the house but the first one was removed because water was draining right over the front door.   This one was removed because I don't need lots of water in my yard in a heavy rain.  It all ends up in the street anyway so why not direct.   The plastic pipe off the roof is kinda funky Mexicanada but it'll do for a few years.

Cement wash lifted

Whole roof after some patching

Rusting gas tank

No more ceramic water spout into the yard

Thursday, April 7, 2011

Floor patterns

There have been a number of jokes about "my hospital" and the mono-chrome colors so far. Workers wanted to cut tiles and make a design in the middle of one of the main rooms (same tile, different tile, now we need to shop?). Personally I don't mind a light mono-chrome environment. Light colors reflect light, you can see the dirt ... and you can see the critters.

I went to Interceramic in Melaque and they had nothing that fit my idea of a color scheme. Back to Cihuatlan where I bought most of the tiles and bought this green tile. This green tile is nothing I would buy as the principle tile for a room but thought it might work as an accent. I do think it's reasonable.

Now my workers want to outline this pattern with black, blue or I don't know what ... colored grout. I had to say sorry, the same grout for the whole house, "cafe champagne".

This center piece will also draw attention away from the walls that are not straight or aligned with the house

Friday, March 25, 2011

Sidewalk and Driveway

The new sidewalk and driveway are finished and they look good. That was the last of the major cement mixing so we are breaking up the very large pad that has formed over the years and will soon be back to dirt.

The glass guy was here yesterday installing all the panes and within a week he'll install mosquito screens on all the windows and make a front screen door.

Hector and Oscar started tiling one bathroom and it looks great. We somehow under estimated the number of wall tiles (azulejos) we need so I'll buy 4 more boxes in the next few days. They will also use some on the sides of the kitchen counter.


Sunday, February 20, 2011

More Tecata

This is the last of 3 roofs to tile. The second floor laundry room and the main house are finished. Quite a project and didn't come out smooth like I pictured it. I suppose with two more layers of cement wash the tiles pattern would dissapear but it's not necessary.

Next week starting on the redesigned stairs and waiting for the rest of the doors and windows.  The electric is in with four fans installed.  The plumbing is finished except for areas waiting for tile and counter tops - baths and kitchen.   One room left to give the first coat of sealer-paint mix.

Pump house and bodega

Main roof

Thursday, February 10, 2011

Installing a Tecata Tile roof

The roof tile installation has started. First photo is yesterday filling in the first section. They lay out rows (rayas) at a measured slope, about 4 inches at the highest point down to one inch in the direction the water will drain.

The second foto is starting a small section off to the side and the main section is done. When finished with a third large section this all will all be covered with a thin wash of cement and sealer (sellador)

Day one - filling between the 'rayas'

Day two - first large section done

Tuesday, February 8, 2011

Tecata tiles are here

The tecata tiles arrived sooner than expected and late enough in the day that we had to leave then in front of the house over night. We also had to get a pulley and large rope used to pull them up the wall bucket by bucket.

Hugo pulling from below, Oscar handling the buckets at the top ... and me stacking them. From 9am to 1pm and 3000 tiles later they are up on the roof where they will be used


Pinal Villa, Melaque, Mexico

Saturday, January 29, 2011

Making tecata tiles

An upcoming project is covering the roof with tecata tiles and I've been looking for a source for a few weeks. Finally found this brick yard behind Jaluco just past the new Melaque Bypass road. I put in an order for 3000 and he says he'll have them in 9 days (make that 7 now).

This guy also makes fine finish brick (in foto) on order and I was surprised to see a builder from Nayarit that has been building a number of gringo houses ordering more. His houses aren't intended to be stuccoed, just nice brick with mortar well tucked between. They look nice but dark inside for me.

The idea with my roof is it needs a slight slope for water runoff and they will do that with cement covered with these tiles like tiling a floor - and then covered with a thin cement wash. The extra layer is also more insulation, the tiles absorb moisture and the second 'floor' is a separation barrier.

Tecata tile drying in the sun

Stacked for firing with some fine bricks drying

Working in the brick yard

The whole family works there

The brick kiln fired with coconut husks

Sunday, February 15, 2009

Building a swimming pool in Mexico

This Pool project is shown from start to finish. Sadly Barbara and I had to move out of this place due to landlord problems after she paid for the entire construction. Another lesson to trusting gringos new to Mexico. There is a link to a complete foto set of the project at the bottom of this page. Not sure if we'll get around to a pool on our lot some day but we should have the room for a smaller one


Cement floor directly on the sand

Double rebar around the sides and in the second floor layer

Side walls getting finished

Grounting in the tiles

Link to more fotos of this swimming pool project
Related Posts Plugin for WordPress, Blogger...